- Create a Paymaster Policy on Cloud
- Use the policy in your dApp to sponsor transactions
- Sponsor using Appkit’s embedded account
Prerequisites
- A fundamental understanding of JavaScript and React.
- Obtain a new project Id on Reown Dashboard at https://dashboard.reown.com
- Since Gas Sponsorship is an early access feature, your projectId needs to be access listed. Please contact us.
Part 1: Steps to Set up a policy
- Open the Reown Dashboard and click on “Paymaster” in the sidebar.
- Click “Add Policy”. When prompted, choose “Testnet” chains for testing.
- Enter your Policy name and click next.
- On the chain selection screen, simply click next since all testnet chains are enabled.
- You’ll then see the Control Sponsorships screen.
- For most cases, the no-code builder works well, though there is a detailed guide for custom policies if needed.
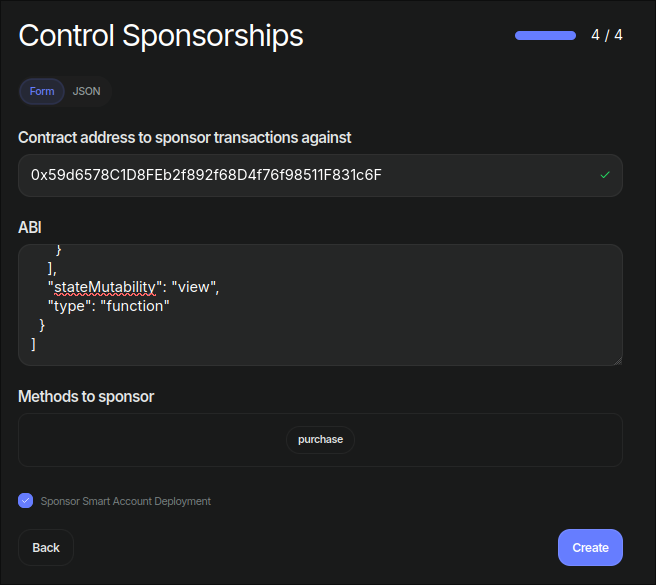
- Input the contract address
- The ABI of the contract
- Select the method you’ve chosen to sponsor
- IMPORTANT: If you would like to sponsor the deployment of smart accounts
on your app, tick the
Sponsor Smart Account Deploymentcheckbox. - Click “Create”.
Retrieving the Paymaster URL
Each Paymaster is linked to a specific chain. Click the “RPC URLs” button to view all supported chain URLs.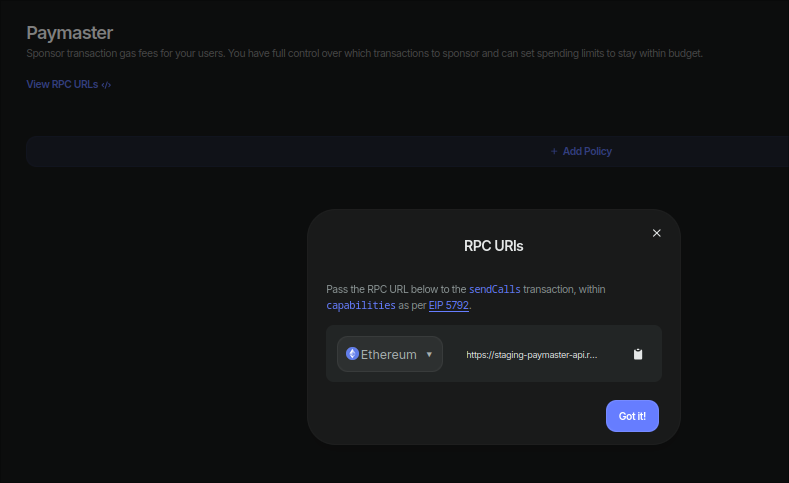
Sepolia and copy the URL provided to get your paymaster URL.
Testing the Paymaster Out
Before integrating this functionality into your dApp, you can test that you set up the policy by visiting Appkit Lab. Login with Appkit Email or Social Login (Google, Apple, etc) Scroll down to “Send Calls with custom abi (Paymaster Service)” and- Input your smart contract address
- Paste the ABI of the contract
- Select the method you’ve chosen to sponsor
- Add any method arguments in the format of an array
- Add any value if necessary
- Paste your Paymaster URL
- Hit send calls.
- In your browser’s network tab, filter for sendUserOperation. If the payload includes paymasterAndData, it’s working.
- Alternatively, copy the send call result, paste it into “Get Call Status”, then use the transaction receipt on Sepolia Etherscan. It will show the paymaster covering the gas.
Part 2: Integrating with your dApp
After setting up your policy, you can seamlessly add blockchain call functionality to your dApp using Wagmi’suseSendCalls hook.
This hook simplifies interacting with the blockchain, allowing you to trigger transactions directly from your React component.
Define the ABI
Calculate CallData and Prepare the transaction
Import sendCalls from Wagmi
Add Event Handler to a button
Troubleshooting
If you’re running into issues getting a transaction to be successfully sponsored, it’s best to isolate issues. So to get started, first:Setup Environment
- Use AppKit’s Embedded Smart Wallet: Login using social login (Ex. Gmail) or your email
-
Ensure the code performs send calls as simply as possible., eg: hardcode
the
capabilitiesobject and remove any extra conditional logic. - Keep the network tab on your browser console open
Ensure a call to the paymaster is being made
Since the embedded wallet lives on your browser, you can observe the network calls it makes. If, after performing thesendCalls and approving it in the AppKit Embedded
Wallet, there is no call to the paymaster URL provided, it likely means
that the capabilities were not filled in properly.
Ensure the capabilities object you’re sending looks like this:
Paymaster was called but returned an error
Simulation Errors
The most common errors encountered with integrating Paymasters typically come in the form of simulation errors. Thankfully, the paymaster provides a full report of user ops that run into errors. For example:No calls were made to the specified contract.
- Ensure that the chain ID provided in the paymaster URL matches the network you are on
- Ensure you are targeting the contract and method specified in your policy
Not sure if everything’s set up correctly?
- Confirm a call to the Paymaster is being made via the network tab
- Ensure the response from the call is not
0xor anerror. - Verify the call to the
bundler(also viewed in the network tab) that is performingsendUserOperationhas filled thepaymasterDatafield - Grab the user op hash (result from
sendUserOperation) and paste it into a block explorer that supports searching by User Op Hashes like BlockScout - Ensure the paymaster sponsor field is filled